Showing posts with label St. Croix. Show all posts

Friday, March 13, 2009

Day 33 - Pumpkin Ravioli


Sorry I've been away, thank you for the emails reminding me to keep you up to date. I appreciate it! So much has happened that it's hard to go back and write the entries I missed, but it's also a wonderful opportunity to relive some of the wonderful days we've had here at VISFI.

Slow foods week has been awesome. Spending the days in the kitchen with Chef Keith and talking to Dan about his favorite subject (food) has been inspirational. I can't wait to get back to my own kitchen space.. Today's lesson are two slow food meals, lunch and dinner. For lunch we chose one meal that we don't get much on the farm because it is so labor intensive, but there is nothing better than homemade pasta.

It was a long day in the kitchen, but well worth it. There is a synergy between the members of this group and that is amazing to step back and watch. Ashley doesn't often work well with others, but even she is realizing the support and cooperation that we have. Getting out my camera today and capturing a bit of it on film was the beginning of my final project. It feels a little like the beginning of the end, but I will enjoy putting the final pieces together.

The Pasta:
3 eggs
2 cups flour (we used AP, but you can do a percentage of whole wheat)
+ whatever flavor you want to include. We made: parsley, rosemary, moringa (our superfood), black pepper, and a few others)

If you are going to make a pumpkin filling from a garden pumpkin, first harvest a massive pumpkin, chop it into chunks with a machete, and bake it. Don't forget to take out the guts.

Make a well in the flour and crack the eggs into the center. Beat the eggs with your hands and slowly work in the flour. You may or may not need all of the flour depending on the size of your eggs and the humidity, keep watching the dough for a good firm, not tacky, but not dry consistency. Unlike bread that you can only knead a little in order to develop the gluten, a lot of kneading is required for pasta. To knead the dough, fold it into itself and press, rotate, fold it into itself again, and press again. Continue this process for 20 minutes. Leave the dough to rest at room temperature for 45 minutes to an hour. We wrapped our dough balls in wax paper and set them aside and in the meantime, we made some vegan pasta for our more animal-friendly friends.


Vegan Pasta
2 c flous (1/2 to 1/2 whole wheat to white)
1 Tbsp olive oil
1 tsp salt
1 1/2 cup water

Follow the same mixing procedure. Just like in the non-vegan version, you may not need all of the water.


Once your dough has rested, cut each dough ball into 1/4ths and roll very thin. You want to roll it out into an oblong shape with a long, even motion and pressure.
Once you can see through the oval cut it into squares. If you cut larger squares you can fold it over into a triangle, if you do smaller squares you can stack two on top of each other and make the square, it's up to you.


When the pumpkin is out of the oven and soft it's time to mash that up and make your filling. We used mashed pumpkin with a little sage, but you can put any herb that compliments the flavor of the pumpkin and goes well with what flavor you put in the ravioli (if anything).

Now it's time to stuff them! Take the squares and put a dollop of your cooked filling into the center. The key here is to not put too much because it's essential that the pasta seal completely, you don't want it to fall apart.

Boil and top with the awesome homemade sauce we had going on the side.. (saute onions and garlic, add tomatoes to cook. Remove from heat and blend. Right before it's time to serve, add the fresh herb spices so they are at their maximum flavor. Delicious!)

I would have put in some post boiling lunch shots but by the time we were done making these beauties we were so hungry that we scarfed them all up and no one took pictures. I guess that is the beauty of slow food.

For dinner we made pizza, always one of my favorites!

Saturday, March 7, 2009

Day 32 - Simple Slow Food Tactic

Ditch the pre-packaged salad dressing, make a vinegarette! What is in that junk you are pouring on your greens? Is there high fructose corn syrup, preservatives, and a list of ingredients you can't pronounce? A good place to start thinking about slow foods is the simple salad dressing metaphor; it takes 30 seconds to open the fridge and take out a salad dressing and slather those chemicals onto your otherwise healthy dinner. Take an extra five minutes and make a dressing and you have added love, creativity, and probably some healthier ingredients to top those veggies.

"Slow Foods" doesn't necessarily mean "All DAY Foods" (although it can.)

I know this is silly, and Sarah showed me many times how she made such great balsalmic dressings, but sometimes I need a thorough explanation and to take notes in order to really get it. So, we went into the kitchen to go over basic dressings.

Think about what kind of dressing you want to make, what you have around, and get together your ingredients to prepare your "mise en place."

Oil to Acid ratio:
3 to 1, 2 to 1, and sometimes close to 1 to 1, depending on the taste of the vinegar and other ingredients. Good average to think about is 1.5
A good oil; cold pressed olive oil or other oils that have not been processed and denatured.
Start with a root crop, diced finely: garlic, onion, shallot.
Vinegar (we used sour orange and cider vinegar.)

EMULSIFY: This is the part I never quite got right before this class. Blend all of your veggie ingredients and then slowly add the oil, while beating the mixture. Season with salt & pepper to taste.

Yawn! So much to write, I need to go to sleeeep.

Wednesday, February 25, 2009

Day 28 - The Last Math Blog and Installation

Thanks for sticking through the math in the last post, we have a little more to do today and I promise the blogs for next week will be calculation-free (except multiplying recipes and the magic of baking). For me, it was a really interesting experience to be in a mixed-level math class, sitting all day working out equations, and be truly enjoying myself.

Step 4: The Charge Controller, the Inverter, and the Wires

CHARGE CONTROLLER - function is to maintain the batteries at the proper level of charge and to protect them from overcharging. When a solar panel is bringing in power it will first go to run the loads on the system (lights, fans, etc) and then any extra will go to charge the batteries for use later.
Power = 100W (1 panel) divided by 12V = 8.3 Amps
Of course, we could use a 12V/12 Amp charge controller, but that wouldn’t give us much room to control for sudden increases in voltage, etc. The max voltage is taken into consideration by the manufacturer, so really a 12amp CC really has a max voltage of about 22 or so. On farm we have a currently unused 12V/36amp Charge controller, so, we will use what we have. A charge controller will run between $100-250, or more depending on the size and quality.

INVERTER – Because the PV system runs in DC, you must use an inverter if you would like to power AC devices. You need to keep in mind the maximum (peak) watts needed at one time. Our client, Chef Keith, needs 86 watts of AC power at one time if he were running all of his devices at one time. That is NOT very much because this system is already maximized for efficient appliances and lights. Much like the CC, we have a 12V/150W Inverter, which will cover the 86watts needed and give some head room just in case he introduces a new device. The cost of an inverter is dependent on the shape of the sine wave. If it is a modified sine wave it will be cheaper, but if it is too choppy it will not have an even current.

WIRES – I am not going to go into this calculation because it turned out to be a huge pain. Because we are only using a 12V panel and a small CC, we cannot increase the voltage to decrease the amount of current, so there will be a lot current and thus, a lot of resistance. Here is one calculation:
The distance from the panel to the CC is 30 feet
12Gauge wire has a resistance of 1 ohm drop per every 650feet, so the drop over 30 feet is about 0.05 ohm.
If we have to keep voltage at 12, the max current is about 16Amps.
Power loss = I2R
162x0.05 = 12.8W, it’s a 220W system, so that is about a 6% loss. 6% is too much loss, we had to move up to 8gauge wire in order to get low enough resistance.

Step 5: Installation


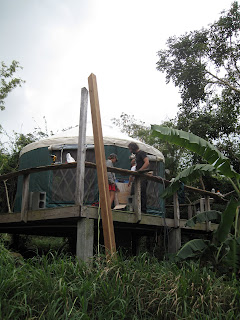
We mounted the one panel on the top of a very long board, anchored to the yurt platform. Installation would have been better if it hadn’t been a rainy day, so whenever the downpours got worse we went inside the yurt to take care of installing the batteries into the floor of the platform. I didn’t get to do much by myself because of the number of people involved in the task, but it was good to see how to hook up the big 6V batteries into two series strings and then hooking those in parallel.

Can I put one together for you with this one-week tutorial? No, but I have a much greater understanding of the components.

Moreover, learning about solar energy has been a great lesson in the excesses of our modern lifestyle. When you list every appliance, light, AC adapter that you plug in, you start to realize just how much energy your home consumes. Do we need an inversion blender, a mixer, a food processor, a magic bullet, and a small chopper in every kitchen?

Do you really need a curling iron?

Monday, February 23, 2009

Day 27 - Solar Energy Design Guide (part 1)

Here we go, it's time for math class.

I am no math expert, this is a blog for the average person who is curious about what goes into designing a solar energy system. I welcome all comments and discussion about the calculations here. The basic formulas are:
Volts = I (current)R(resistance) = I = V/R or R = V/I
Power (watts) = VI = V2/R = I2R
Energy = VIH
Next entry we will also have to calculate the voltage drop in a line, which we will use:
VLOSS=ILINERLINE

Designing a PV power generation system is not as hard as installing one, or so my experience so far leads me to believe. Days 27 and 28 will be devoted to the action project for the solar energy week; designing and instaling a real-world system for one of the structures on the farm. Chef Keith will be introduced in more detail next week, slow foods module, but he gets to play a role in this weeks project by being the lucky recipient of lights and a stereo system in his yurt.

The Yurt

Keith's yurt is standing on a platform made of "lumber" from recycled plastic. It was all built many years ago during the early construction phase of the farm. Even Ben Jones, the founder of the farm, lived in the yurt for three years. It has running water and has been a useful structure for many inhabitants, but other than some old extension cords run from who knows where, it's dark.

Here are the steps we went through for determining our solar array for the yurt. The array consists of: panels, charge controller, battery bank, and inverter (to run AC appliances as well as DC).

Step 1: Determing the Power Consumption


This is a tricky step. None of the calculations are "easy" but this one requires some soul searching. How much power do you use? When? How much power do you need? What does your curling iron take up, 1500W? Can you get a DC fridge?

Consider your AC and DC power requirements separately. We made a simple chart so that we could organize our data and reference back when we needed to adjust.
Appliance, Watts, Quantity, Hours run per day. Total that up the daily needs and then multiply by the number of days per week that you will use that particular appliance to get your watt hours per week. Total up the number or watt hours for all DC appliances then multiply by 1.2 (to compensate for system losses). Then do the same for AC appliances.

Add up the AC WH/Week and DC WH/Week. To determing the number of Amp-hours of energy required for week, divide this number by the voltage of battery you are using (usually 12 or 24V). Then divide that number by 7 to determine the average requirement per day. Here is what our totals were if Keith is running a DC Fan, two types of DC lights (efficient), charging a laptop, running a laptop off the wall power, charging a cellphone, and running an iHome stereo (very efficient):
DC WH/Week: 1831
+ AC WH/WK: 1370
= 3201 WH/WK
x 12V (we are using a 12V battery bank)
= 267 AH/WK
So the average amp-hour requirement per day = 38.1 AH.

Step 2: Size the Battery Bank


When determining how much energy we need to store, the first big question is how long does he need to be able to last without any sunshine. If a hurricane were to come through he could expect to be without direct sun for a few days. We decided that three days of using everything full blast would be enough, assuming that if he really needed to run his stereo or charge his cell phone he could do so at the community center. Also, you need to determine how much charge you want to remain in the batteries at all times. We chose 20% capacity as a reasonable amount of depletion that would not damage the batteries for long-time use.
AH requirement for day: 38
x Days of autonomy: 3
= amp hours needed to store: 114
+ 20% to remain in the batteries
= 136AH is needed to be stored at 12V in the Battery Bank.

It's not a cold-weather climate so we don't have to worry about the ambient temperature multiplier, but we do need to look at what batteries we already have.

Because we already had four 6V batteries with 220AH it made most sense for us to use those. However, because of their age they are about 50% depleated of their total storage capacity. Assuming it's exactly 50% depleated we should calculate that each of the 6V batteries actually holds 110 AH. We need 136 AH at 12V.

2 6V batteries run in series adds the AH over the series making the total 6V and 220 AH. We need at least 136AH, so if we run those two strings in parallel, then we add the voltages toether to make 12V and the AH stay constant, bringing us to 220AH at 12V, enough to give us some room to breathe.

Step 3: Determine the hours of sun available per day and size the array


Now, how many panels do you need? First, available on-farm we have 4 180W/24V panels that we can't use (12V system), 4 100W/12V panels, and 4 75W/12V or 24V panels.

Determine the Power requirement per day
Daily AH requirement: 38.1
x 12V
= 457.2 WH/day

OK, we need 457.2WH, how many WH does each panel give off? Multiply the wattage by the number of hours of sun per day. In St. Croix the average is about six.
1 75W panel x 6 hours of sun = 450WH/day (not enough)
1 100W panel x 6 hours of sun = 600 WH/day
= perfect. We need one 100W panel at 12V to fill our power needs and contraints.

The other items in the array? The charge controller, the inverter, the wires, and the fun of installing it in the rain.

Tomorrow I'll complete the package..

Thursday, February 19, 2009

Day 24 - Solar Energy Intro

Today we began a new module. When I was looking at opportunities to take a few months to volunteer, work abroad, or do an internship, there were so many options. I was drawn to this program because of the variety. Sure, when I leave here I’ll need a bit more experience before I can start my own organic farm, but I will have some new perspective and skill over a wider spectrum of areas which I can decide to further pursue at a later date.

Sure, the agroecology unit that we just completed is key to learning how to farm in a sustainable manner, but also alternative energy is an important aspect to managing energy costs. Eventually getting off fossil fuels is an important part of sustainability, as is consciousness in consumption. The first step in designing any solar or alternative energy system is determining the need. I think we all would be a bit shocked if we really looked at where we waste energy.

For us, this was a good segue from the Ag Fair into the alternative energy unit because we had a clear demonstration of this useless excess.

The Ag Fair is a huge draw, it is estimated that 30,000 people come in from other islands. Some people coming in for Ag Fair decided to do a farm stay with us in the two open cabanas, tent camping in the field, and in the tree house. Some of the groups were more friendly and reached out to the community and some.. well.. Someone plugged in a curling iron and blew our whole system, leaving the 10 of us at cabana land plus the 8 guests in the dark for a day and a half. Now, was that really necessary? Luckily we have long, sunny days, a separate system for the community center, and electricians who can fix this stuff when it’s broken.

I have never been spectacular at math. However, I love science and if I have a calculator in front of me--and a good teacher--I can usually make sense of the material.

One good teacher is key, two is bonus. Don Young, electrical engineer and an all-around innovative thinker, is visiting from Georgia to teach us along with Dan Glenn, the director here on the farm. Combined, they make up just the type of teaching team that plays to the strengths of different students.

Do you remember high school circuits and basic engineering? No? Well, I have never enjoyed figuring equations like I enjoyed that class. I can’t wait to learn more.. It was an easy physical day but I'm mentally exhausted.

Thursday, January 15, 2009

Day 1 - Introduction


After spending a few fun-filled days in Christiansted it was time to break away and head into the rainforest.

Creque Dam Farm (it's pronounced "creaky") is amazing. Living in a truly diversified sustainable environment has been both eye opening and inspiring. It's only the end of the first full-day and I already am vibrating with excitement. Today we started out with simple getting to know you activities to introduce each other and our various backgrounds. Each of the instructors bring some interesting skills from agriculture, animal husbandry, to primitive survival. As for the students, we come from some different backgrounds. Some have lived on farms or worked on farms at some point and am looking to expand on that experience while some, like me, are a little older and are mostly looking for knowledge and education to make life changes. Some of us have spent years doing what was expected of us and some were encouraged to take their own paths.

I am going to try to keep my posts up to each day of the program so that each post will build on the one before. I will start with some background and color.

Creque Dam Farm is a 200 acre farm in the rainforest near Frederiksted, St. Croix in the US Virgin Islands. It has been in the works for over 6 years and before that the land was used for horses and in the distant past, sugar cane production. The farm is built with the ideas of permaculture and sustainability. The water is produced through the well and roof gathering. The water system is run by a solar-powered pump as are all of the other electric systems.

I'm living in a cabana on the hill overlooking the rest of the farm. It's open air (with screens doors and walls). It's not entirely sealed off from bugs but the lizards are always hungry. It is surrounded by nothing but dark and the sounds of the forest at night. It is truly something to behold. 9 weeks in here.. There is more that I want to learn than I feel I will have time for.

Check my flickr page for photos! Here are a taste from the first farm tour.


Off to bed, big day tomorrow. I have many more entries to write.